80% lower AR-15 completion using the 80% Arms Easy Jig gen 1
Manufacturer's sale page for the Easy Jig
NOTE: 80% Arms now offers the second generation of the Easy Jig which you can read about here.
For a long time I was interested in completing an 80% lower but did not have access to a milling machine which was required to make a nice looking lower. There were, and still are, other methods that do not require a mill but I did not like the method used. This included both the "jigless" system such on the original EP Armory lowers and the "drill a bunch of small holes" method such as the Stealth Arms and similar jigs. Then 80% Arms came out with the Easy Jig which used a router as a mill using various adapter plates and a spacer. This was just the type of thing I had been waiting for since I already own a router. I do own a drill press but it is a portable model and not large enough to use an X-Y vise which is one solution for turning a drill press into a quasi-milling machine. The problem with the drill-press-as-milling-machine is a drill press is not designed for lateral (sideways) forces while a router is which makes it a better platform for milling an 80% lower. This is more of an issue with the aluminum lowers and less so with the polymer lowers.
I ordered both an Easy Jig and one of their billet lowers designed for the Easy Jig. Using the system was very easy with a few quirks but overall a well thought out process. One small complaint I have is the need to remove the top rear jig screw to complete the rear pocket area. But that's really unavoidable and the system is plenty strong without that rear screw. I guess what I'm really complaining about is the rear pocket is not already completed in the 80% Arms billet lowers when it apparently could be as there are several other companies selling 80% lowers with that area already milled out.
The main complaint I have about the Easy Jig is how difficult it is to see what you are doing when trying to mill out using the router. With a long end mill you can easily tear into the templates on your first several passes. It's very difficult to get any light into the area when you are routing which caused me to bite into the template. I was able to repair the area with some JB Weld and some careful filing. In hindsight one really needs to stay away from the edges of the template until very near the end of the routing. Then the smooth shank of the end mill can run along the template as a guide. I also found it helpful to run a strip of bright green 3M 233+ masking tape (found in auto body supply stores or online) along the inside of the template which makes it stand out in the dimly lit work area. Then on the last passes, when the end mill will contact the template, the tape should be removed.
Edited to add: 80% Arms has had a custom end mill designed that has the full 4" shank but shorter 3/4" cutting flutes. This will eliminate the need to avoid the edges of the template on the initial passes.
I have also found that using a router collar with a full length end mill will save the sides of the template from damage.
They have also made modifications to the Easy Jig which will make it more universal to work with other lowers on the market. I have tested the fit of these in all of the lowers I have machined and all have fit except the New Frontier Armory billet lower.
ETA: 80% Arms now offers more options on their Easy Jig. One is an Easy Jig with side plates that contain steel bushing inserts in the area where the trigger pin, hammer pin and selector switch are drilled out. This will help prevent any "egging out" or excess wear in these critical areas for users that intend to machine a lot of lowers. I have found that the original jig with its hard anodizing was very wear resistant but this will certainly increase that. The cost is only $20 more than the standard jig and I would recommend the upgrade since it is such a low cost. They have also created a solid steel Easy Jig and, according to their site, "All parts that come into contact with cutting tools are made out of solid steel". I don't own one of these jigs so I don't know any further details such as if the sideplates are solid steel or have the same hardened bushings as the aluminum Easy Jig. Here are photos of the new sideplates with the steel inserts.
The Easy Jig is very well built and fairly heavy. Below is the video on Vimeo that 80% Arms has posted that shows how to use the Easy Jig. It is well made and recommended viewing.
Tools and materials needed:
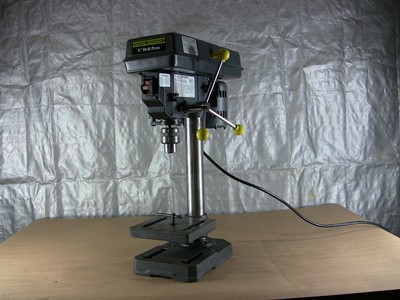 Drill press or power drill - I use an inexpensive Harbor Freight 8" portable/table top drill press which does just fine for polymer and 6061 lowers. I have used it for 7075 lowers and had some trouble with that. I had to set the drill press to the lowest RPM setting and even then had to make sure to give the press a break after every completed 3/8" main hole drilled to keep from overheating. 80% Arms shows that you can use a hand drill with 6061 lowers but I found that this is not the case for 7075. I have a fairly stout DeWalt corded drill and was not able to make any progress in the 7075 lowers. A more powerful drill press than mine might be able to rock through 7075 but my press needed a break. I have also found the key to getting through without binding is getting the speed and pressure on the bit just right when using the drill press. It takes some experience but when you get it just right it works great. I don't even use cutting fluid anymore.
Vise - This is needed to clamp the jig down while routing out the lower.
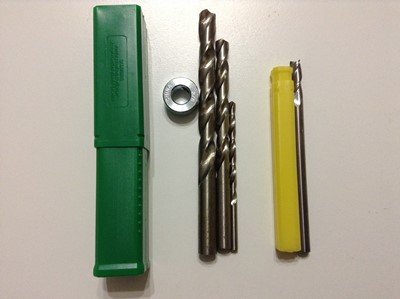
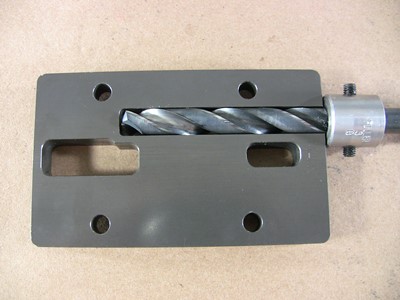
1/4" end mill - This is the size needed to work with the Easy Jig. I purchased the recommended 1.5" cutting length end mill. This longer cutting length can bite into the template if you are not careful but, with caution, this is the one you want to get.
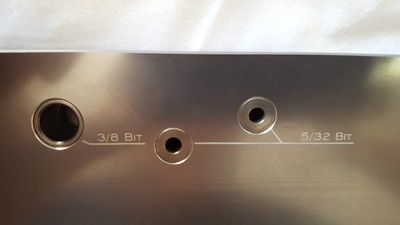
3/8" drill bit - This is needed to drill out the bulk of the material in the fire control group pocket and to drill out the hole for the safety selector.
3/8" stop collar - This is used to set the drilling depth for the fire control group bulk material removal.
5/32" drill bit - This is used to drill the hammer and trigger pin holes.
19/64" drill bit - This is only used to make one hole for the end mill to pass through when milling out the trigger hole. I bought one just for use with the Easy Jig but if I had known how little it was used I might have just used the one from another drill bit set I have. But for four bucks it's nice to know where it is.
80% Arms is now offering a kit which includes a specially designed end mill to eliminate the possibility of biting into the edge of the template during the initial 3/4 of the milling and the necessary drill bits and collar. The end mill is also available separately.
3/32" hex key or Allen head bit - This is used to tighten the stop collar to the drill bit.
1/8" hex key or Allen head bit - This is used to tighten the template bolts.
3/16" hex key or Allen head bit - This is used to tighten the jig bolts.
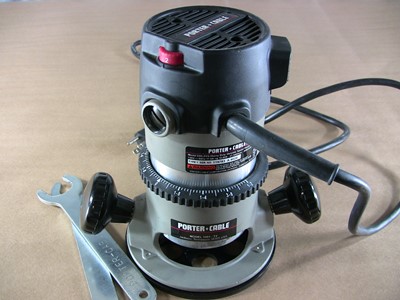 Router with 1/4" collet - The 80% Arms video shows the use of a full size and a laminate trim router. I used a Porter Cable 690 fixed base router for all milling.
Cutting fluid - This is to lubricate and cool the cutting. I used cutting fluid I got from Ace Hardware just because it was convenient. WD-40 is not a cutting fluid but it's better than nothing.
Masking tape - This helps to highlight the inner edge of the template and to tape off the lower to protect it from chips. This is especially helpful with machining a pre-finished or anodized lower. I use the bright green automotive tape but the light brown standard tape would probably work as well for these purposes.
Eye and ear protection - A metal shaving in your eye will really ruin your day and maybe even more. And because no one wants to go deaf on the installment plan.
Small brush - This is useful for brushing metal shavings out of the jig and lower during and after the lower completion.
Shop-Vac - For me this is a must have to clear out chips from the work area and the fire control group pocket after each pass with the end mill.
Assembling the receiver in the jig:
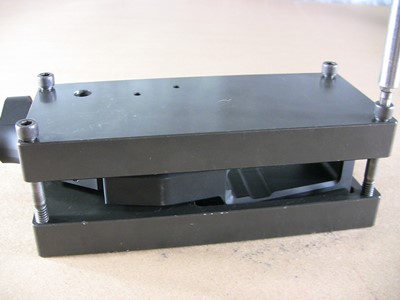 Start by running the top two bolts through the unthreaded jig wall holes and the take down pins of the receiver. Then thread the bolts into the opposite jig wall that contains the threaded screw holes. Tighten the bolts in an alternating manner until the bolts are flush with the outer jig wall. Do the same for the bottom two jig bolts. Then finish tightening the four bolts in an alternating pattern as you might tighten the lugs on a vehicle's wheel. The bolts do not need to be torqued down, just snug to keep the jig walls parallel. The bolts will stick past the jig wall about 1/16" once snugged up.
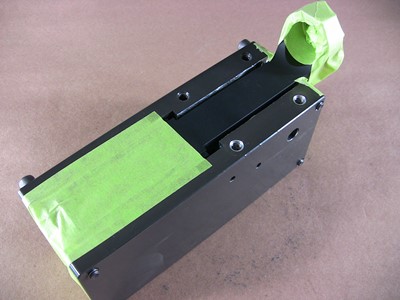 One thing I learned after finishing my first anodized lower is that small aluminum chips from the machining process can flow with the cutting fluid in between the jig and receiver. These chips can then become embedded in the anodizing. I asked 80% Arms how to remove these chips and they recommended a Scotch-brite pad and soapy water. This worked only to the extent that you also removed some of the anodizing to get to the embedded chips below the surface. I would not recommend this. Instead, to prevent the problem, you want to keep the chips from getting into the finish in the first place. I do this but taping off all areas of the receiver that will not be machined or are between the jig and template. If there is a gap that can be plugged, plug it. Just don't get the tape between two mating surfaces such as the jig wall and the templates or you will cause a dimensional problem due to the thickness of the tape.
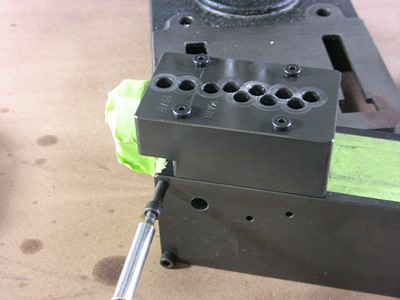
 Attach the pocket drilling template to the top of the jig and insert one template bolt through the template and thread two turns into the jig wall. Do the same for the opposite and diagonal template bolt. This will ensure you have your jig walls parallel and spaced apart correctly. This will become more important if you have a modified jig being used with a non-80% Arms lower. Finally, insert the remaining two template bolts and and tighten in an alternating fashion until snug. Use a piece of tape and cover up the two rear pocket holes so you do not accidentally drill into them.
 Using the rear shelf (MAIN) template set the drilling depth with the lock collar on the 3/8" bit. I prefer to set my drilling depth just shy of the bottom of depth gauge. This prevents the small divots I sometimes see after completing the machining. Now place the 3/8" drill bit into your press or hand drill. 80% Arms recommends a drilling speed of 2500 RPM but I find this is dependent on your drill's power and the material you are working with. For 7075 I had to set my 8" Harbor Freight press to 620 RPM and for 6061 and polymer lowers I used 1720 RPM.
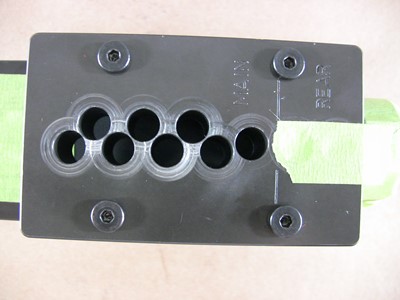
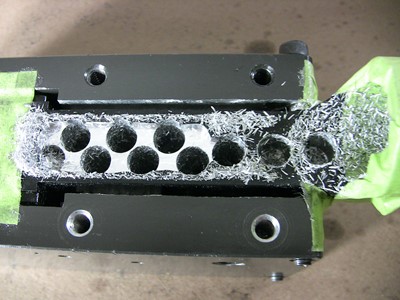
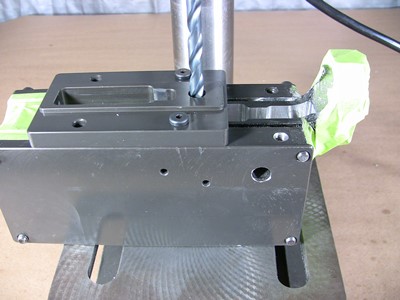
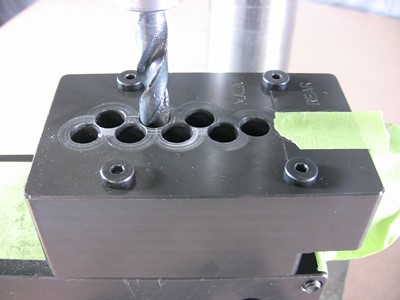 Drill out the holes in the fire control group pocket using the template as a guide. My drill press does not have enough travel to insert and remove the jig assembly without also moving the press table to the side. Use the cutting fluid to keep the drill bit lubricated and vacuum out the chips between passes often. You may need to use a screwdriver to push out some of the chips if they become wedged between the template and the receiver. Do not press down hard into the template or you could end up with divots in the final pocket bottom. Let the end mill do this final pass for a better finish. Also check the depth and tightness of the lock collar often to prevent over-drilling. I choose to alternate which holes I am drilling so the heat from drilling does not concentrate in one area. So I may start with the first hole and then skip two holes, drill that hole, skip to the last hole and then go back to the second hole in the template and drill that. I don't know if this does anything of worth but it makes me feel better and doesn't have any downside that I can think of.
You can reduce the load on your drill starting with a smaller drill bit and working your way up to the 3/8" bit. If you choose to do this start all of the holes first with the 3/8" drill bit and drill to a depth of about 1/2". This should be no problem for your drill. Then switch over to a smaller bit such as a 1/4". You can set the depth with a collar or just put a line of tape around the bit to give you an indication of when to stop. Just be sure to stop well before the tape mark. Remember we're just trying to remove some bulk and not doing any precision drilling. The 3/8" bit will do the final depth of cut. Once all of the 1/4" holes are drilled switch over to the 3/8" bit and finish the job.
 Once the fire control group pocket is drilled out you can move to drill out the rear pocket (skip this part if your 80% lower is already milled in the rear take down pin area). Remove the top rear jig bolt so you do not drill through it. Remove the tape from the template and set the drilling depth using the guide on the trigger pocket (REAR) template. Drill out the two rear pocket holes to the newly set depth of 0.63". Remove the pocket drilling template and vacuum out the chips in the machined area. Re-install the top rear jig bolt. I wanted to note that because I have removed so much material from my Easy Jig that the lower can slip while drilling the rear holes with the bolt removed. Because of that I drill the front hole with the bolt in place. For the rear hole I remove the bolt but leave enough of it in place to catch the edge of the lower which keeps it from slipping.
OPTIONAL: Prepare the trigger pocket template by applying a line of masking tape around the inside perimeter. This will help the inner edge stand out so you are less likely to cut into it when using the end mill in the router. The tape must not extend past the template. I find that a half width of tape from an 18mm roll is just right.
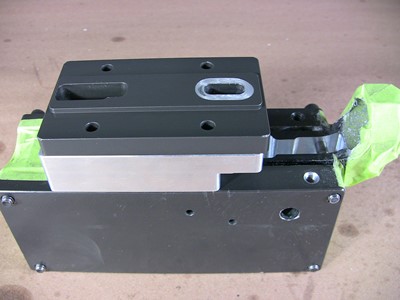
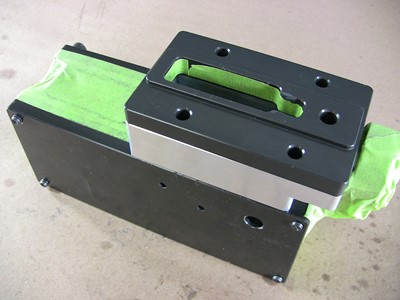 Now it's time to move onto the router work. Wipe down the top of the jig walls and place the template spacer with the longer end towards the receiver extension hole (buffer tube hole). Then stack to the fire control group (trigger) pocket template on this space so the smaller end is towards the buffer tube hole and the lip is facing up. Finally, place the router support base over the lip with the recessed bolt holes facing up. The router base only fits one way so if your holes do not line up rotate the support plate 180 degrees. Now insert the four long (1.75") template screws through the template stack and secure to the jig walls in the same alternating fashion. Secure the assembled jig into the vice. I prefer to install the jig so the buffer tube hole is closest to me. I find it easier to mill without touching to the template when it is in this orientation.
 NOTE: As with all router jigs on the market the hash marks are a bit too aggressive in my opinion. I recommend only going a 1/2 hash mark at a time and starting a 1/2 hash below the first hash mark. There is less chance of your end mill biting and jumping with these reduced depth millings. It does add some time but the finished product will be worth it.
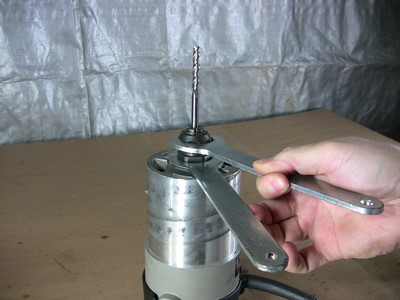
Install the 1/4" end mill into your router. Allow the end mill to bottom out and then raise it up about an 1/8" and tighten the collets. Set the depth of cut to the first hash mark on the rear pocket (MAIN) template. If you have a variable speed router you can adjust that. With my 1 3/4 HP model I set the RPM to "2" on the dial. When using the end mill I prefer not to use any cutting oil but my passes are shallow enough that I find it is not needed unlike the 3/8" drilled holes which remove a lot of material at once and cutting fluid is recommended.
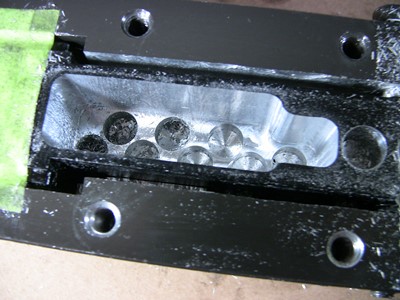
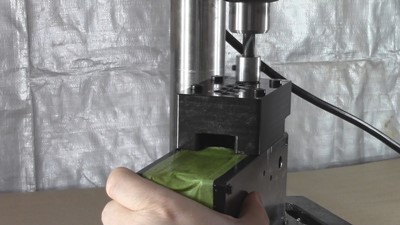 Insert the end mill bit into the furthest hole, turn on the router and gradually connect the drilled out holes to each other in a zig-zag pattern. Once all of the holes are connected you can begin milling out the area start from the middle and working outwards. Because of the way a router rotates the end mill you will want to move around the area being milled in a clockwise direction. Make one complete pass around the middle area of the trigger pocket and then a second pass closer to the edge of the template. Use caution not to get too close to the template or your end mill could bite into the template. It is better to err on the side of caution and stay away from the template for that reason. You will be able to get right up to the template once the cutting surface is below the template walls.
Alternatively you can use an end mill with a shorter cutting length. This will allow the shank of the end mill to ride along the edge of the template from the very first pass. Another option is to use a router template guide collar which will prevent the end mill from contacting the template. Once the cutting surface is below the template the collar can be removed. Now with the custom end mill offered by 80% Arms this is not necessary.
 Once the first pass is complete move the router to the middle of the pocket and turn it off. Wait for the router to stop spinning and then remove it from the jig. If you try to take the router out while the mill is still spinning you could nick the side of the template or injure yourself. Wait the extra 5-10 seconds for it to stop completely.
 Set the second and subsequent depths of cut in progressive 1/3 to 1/2 hash mark increments. Using large depths of cut will decrease the time spent milling but will also increase the work on the router, end mill and possibly cause you to jerk the router into the template. I recommend taking shallower cutting depths until you reach the point where you feel comfortable with the process and know what to expect from the tools you are using and the lower material you have. For stronger materials like 7075 you will want a shallow depth of cut while a polymer receiver can get away with a larger depth of cut. Likewise if you are using a lower powered router you may want to take shallow passes to reduce the load on the router.
 Continue these cuts until you reach the second to last hash mark. By this point the cutting surfaces of your end mill will have cleared the jig template. Now you can allow the shank of the end mill to touch and follow the template as a guide. Keep in mind that you are now going to be cutting into a lot of material between the template and where you stopped your cutting passes. Go slow and in several clockwise passes as you get progressively closer to the template. The final pass that touches the template will determine how clean your finished edge will be so go slow and steady with your cuts. Don't force the router into the template. Just make more and more light passes until the end mill no longer removes material as you run the shank along the template wall.
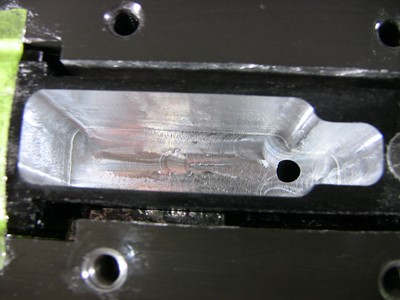 Continue making more passes as before but this time take the passes all the way to the template wall. For the final hash mark I recommend breaking it into four increments. The first two passes should be 1/3 of a hash mark passes and the remaining two should split the remaining 1/3 so you are taking 1/6 hash passes. This is to ensure your final cuts will be very clean and also because the 3/8" holes drilled previously will have a coned bottom, not a flat bottom like an end mill cut. This means your end mill will actually be doing some of the cutting so you want this to be a very shallow cut. In fact I start these final two passes in one of the center holes just in case the router tries to jerk it won't cut into a receiver wall. You actually need to hover the router above the jig, turn it on, and then slowly bring the router down to the jig. During this process you will be drilling a hole for the flat bottomed end mill to sit in and start the finishing passes. Alternatively you can use the revised process that mills out the trigger slot first. Then you an start your router over this hole and won't have to hover the router over the conical holes of the 3/8" holes.
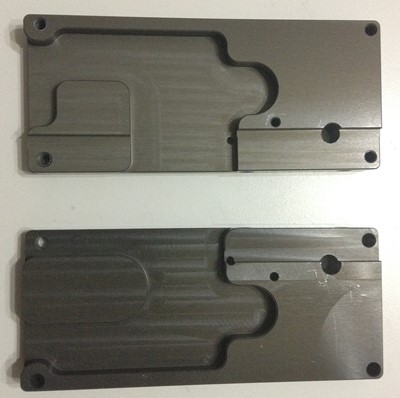
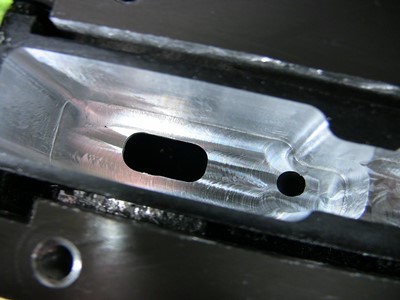
Once the last two passes are complete you can move onto the rear pocket template. If you are using an 80% receiver that already has the rear pocket complete then this will not be necessary. There will be a section of metal between the pre-machined rear pocket and the trigger group pocket if you do not connect them in the next steps. This is fine for an AR-15 style receiver.
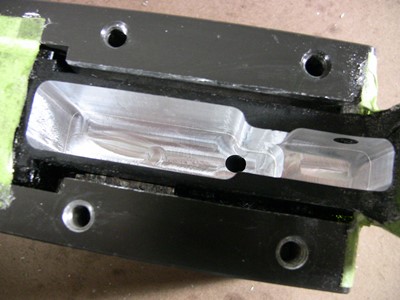 Remove the router support plate and the trigger pocket template and reassemble the jig with the rear pocket template under the router support plate. Remove the top rear jig screw so it does not get milled through. Again, with the amount of material I have removed from my modified Easy Jig I have to catch the edge of the receiver with the jig screw. Mill out the rear pocket just like before but this time using the depth gauge for the rear pocket. Do not complete any finishing passes until the cutting surface of the end mill passes the template walls. Because this area is shallower than the trigger pocket I wait until all of the roughing passes have been made before completing the finishing passes. Once the rear pocket is milled out you are in the home stretch.
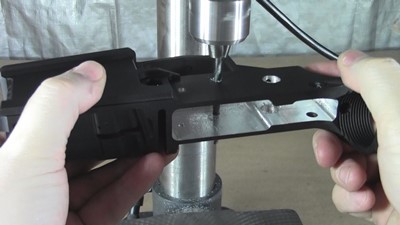
 Now it's time to mill out the trigger hole. We begin by drilling a large pass through hole for the end mill to pass into. Disassemble the templates and spacers from the main jig. Install the trigger template to the jig walls using the 0.75" screws. You will only use two screws installed into the jig walls. The trigger template needs to be oriented so the guide hole is closer to the rear of the jig. The lip of the template should be facing up. Using a drill press for this hole will keep it perpendicular to the template but even a hand drill carefully used will be fine as this hole just allows the end mill to pass through the receiver. Install a 19/64" bit into your press and drill through the trigger hole being careful once you pass through the bottom of the receiver so you don't end up putting the drill bit into the trigger guard. Remove the drill bit and then disassemble the template from the jig.
 The Easy Jig instructions say you do not need the template spacer for this next step but for a full size router you will need to retain the spacer and use the 1.75" screws instead of the shorter 0.75" screws. Otherwise the full size router will run into the back of the receiver. Install the trigger template onto the jig using the template spacer and the longer 1.75" screws. This time you want the template spacer with the long side facing away from the buffer tube hole so only two holes in the spacer line up with holes in the jig. The trigger hole template will go over the spacer, lip up, so the trigger hole guide is towards the buffer tube hole. Then the router support plate goes on top of that with the recessed holes facing up. As before, the holes only line up one way. Secure the stack to the jig using two of the 1.75" screws.
 Because of the depth of cut needed using the template spacer I had to reset the end mill further out of the router. If I didn't do this the router collect would bottom out on the template before the hole was cut through. I get my initial depth of cut for the trigger hole by putting the router on the template base and bottoming out the end mill on the receiver bottom, not allowing the end mill to pass through the trigger hole. Then I place the end mill over the trigger hole previously drilled and increase the cutting depth about 1/16". This means you will not be cutting out the trigger hole in one pass which I have found makes a cleaner cut. Make a first clockwise pass around the hole until the shank of the end mill rides along the template. After this first pass I stop the router and increase the cutting depth so the end mill passes through the hole completely and finish the hole in a second clockwise pass.
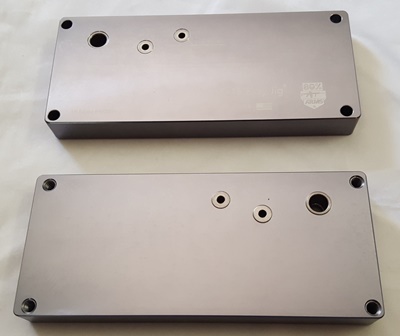
 Almost done now. Remove all of the template pieces from the jig. Place the jig on one side so you can drill out the safety selector holes. Because the bolts holding the jig together stick out you will need to prop the jig up on the two templates, MAIN and REAR. If you are using a hand drill and a vice you do not need to use the templates as spacers. Note that in the Easy Jig YouTube video at around 18:56 the narrator says it is a 5/16" drill bit when in fact it is the 5/32" drill bit. Install this 5/32" bit into your drill and drill both the trigger and hammer pin holes on the first side. Flip the jig over and do the same for the pin holes on the other side. Then install the 3/8" bit in your drill and drill out the safety selector hole on the current side. Flip the jig over and do the same for the safety selector hole on the other side. Keep the 3/8" drill bit in the drill for now.
 Disassemble the jig completely and remove the now completely machined lower. You will likely have to do some minor reaming to the safety selector and trigger/hammer pin holes. The Easy Jig instructions call for a reamer but I just used the same drill bits. Use caution and slowly work the drill bit in the receiver holes. Make short passes and check the fit of your safety selector and trigger/hammer pins in the holes often. You don't want to accidentally oversize these holes but you don't want them too tight either. Once you have the safety selector holes sized correctly you can install the 5/32" drill bit and do the same process for the trigger/hammer pin holes.
 Check that the safety selector detent slides into and out of the hole and that nothing is stuck in the grip screw hole. You may need to clear out the safety selector detent hole with a 1/8" drill bit if it has a chip or flashing from the drilling operation. If everything checks out you can wash the drilling fluids and metal chips from your lower with soap and water. Be careful not to scrub any metal chips into the anodized finish. Soapy water and a gentle toothbrush will lift away the particles. After cleaning you can wipe down the lower and set it out to dry or put it in an oven at low temperature (150 F) for 10-15 minutes to evaporate any remaining water. I actually run wash my lowers in the sink initially and then run them through the dishwasher to wash away any bits I may have missed. Then I shake them off and put them in the oven to dry completely. If you use the oven make sure you allow the lower to cool completely before handling.
Let's take a look at the following comparison chart and see which of the reviewed lowers have which features. Click here