80% lower AR-15 5D Tactical router jig review
NOTE: 5D Tactical released a new "Pro" jig on 11/11/17 which seems to have replaced the original jig which this review is based on.
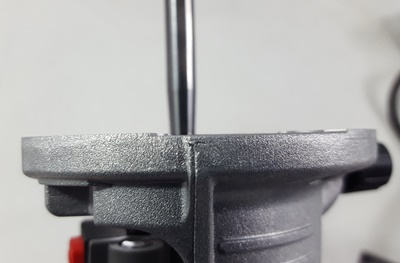
The 5D Tactical jig is the third (that I'm aware of) router-based 80% lower completion jig on the market, preceded by the 80% Arms Easy Jig and the Modulus Arms Jig(s). The 5D Tactical jig system shares some similarities with other router-based jigs but also takes a very unique approach to the way the jig works. Like the Modulus Arms jig(s) the 5D Tactical jig builds the jig over and around the lower. This makes it compatible with more lower designs because there are fewer points of contact with the lower. Specifically it attaches at the rear extension of the receiver and the front pivot pin area of the receiver. These two points are common to all lowers. Though similar in that regard the Modulus Arms and the 5D Tactical do not place the top plate of the jig at the same height. The Modulus Arms jig places the top surface of the jig completely above the lower while the 5D Tactical jig lowers the height and allows the rear of the receiver to protrude above the top surface. This would normally prevent the use of a router to finish a lower but the 5D Tactical system circumvents this by placing the router onto an adapter plate which clears this section of the receiver. The router adapter only works with compact routers and I'll explain how that integrates into the system later.
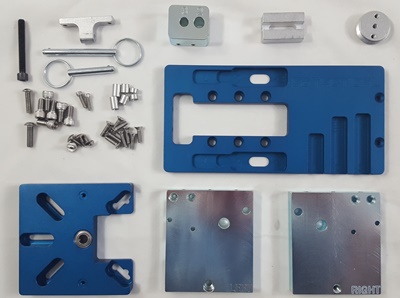
Here's what comes in the 5D Tactical jig kit. There is one top plate with integrated depth gauges, two side plates, one drill guide, one (buffer tube) receiver insert, one pivot pin receiver insert, two cotterless hitch pins (one for the front pivot pin and one for the rear takedown pin area), one compact router adapter plate, adapter block and various screws and pins for the system.
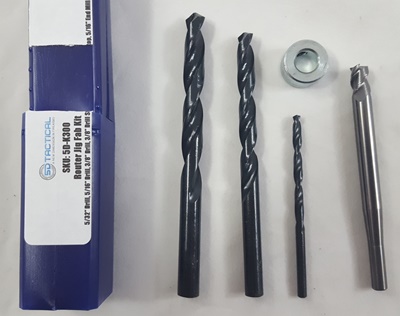
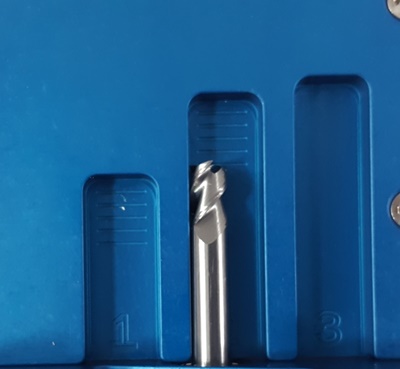
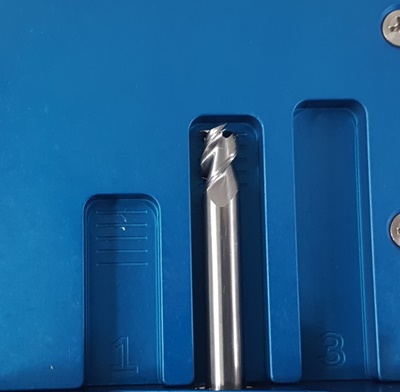
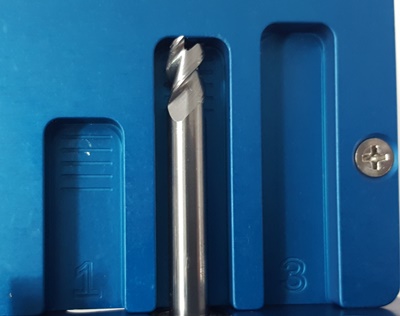
The optional drill and end mill set contains a 3/8", 5/16" and 5/32" drill bit, 3/8" stop collar and proprietary 5/16" 3-flute end mill with a 1/4" shank (for standard 1/4" router collets). While the drill bits are standard sizes the end mill is proprietary and designed to work exclusively with this system. You will need to purchase this end mill for this system. The end mill is $40 and the end mill with the drill bits and collar is $50.
How the 5D Tactical jig system works:
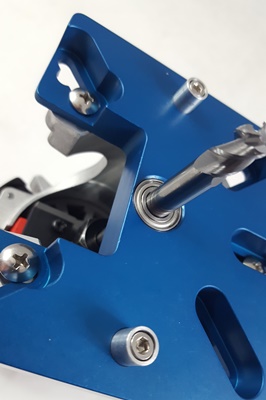
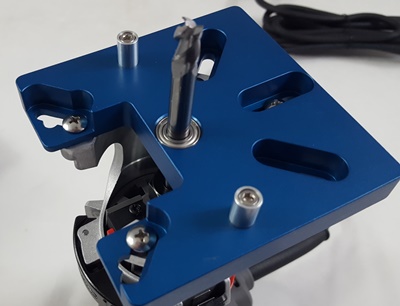
All of the 80% AR lower jig systems on the market that I am aware of, whether they be router-based or milling machine based finishing, operate on the same basic idea. Build a jig around the lower and then use an end mill to trace around various jig inserts placed over the fire control group area. This works perfectly well if the operator uses the system correctly and doesn't push the end milling, spinning a many thousands of RPM, into the jig inserts. Doing so can cause the end mill to flex, creating imperfections in the fire control group pocket, and even burn into the jig insert. The 5D Tactical jig uses a different approach. Instead of running the spinning end mill around the interior of a jig insert you run a pair of pins in the router adapter plate along the interior of varying depth cutouts in the outer sections of the top plate. The end mill shank doesn't make contact with any part of the top plate or inserts. This eliminates the possibility of user-induced flex in the end mill or even cutting into the jig insert with a standard cutting length end mill (not that I've ever done that).
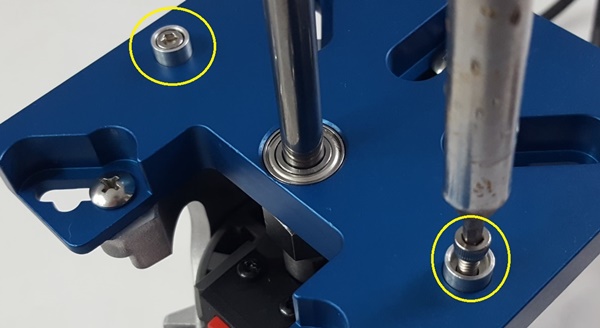
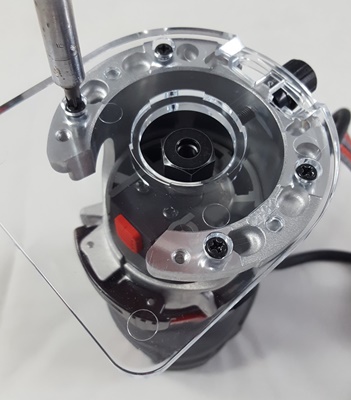
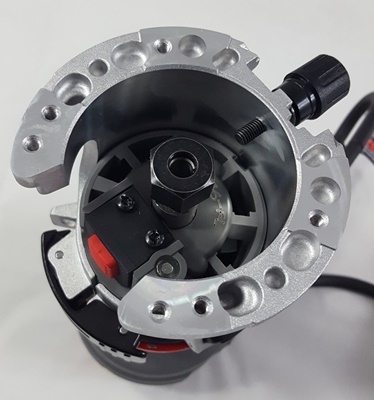
Let's jump ahead for a moment and look at the router adapter plate so we can see how this works. The compact router will attach to the router adapter plate which has two screw holes on the bottom surface. These two screw holes get one of three varying length aluminum pins attached to them by screws. It is these pins that make contact with the top plate of the jig.
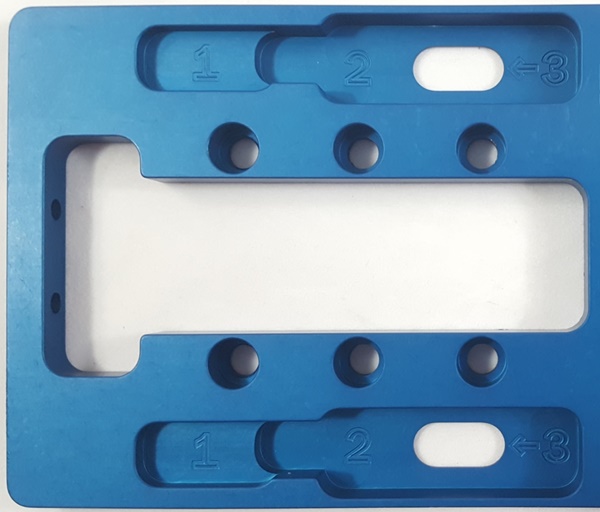
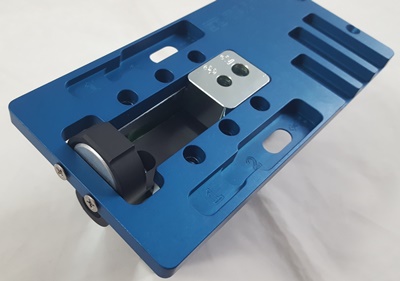
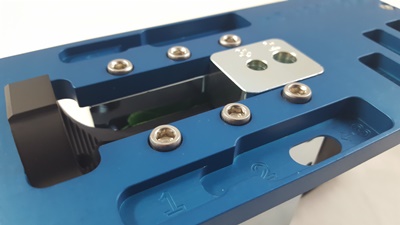
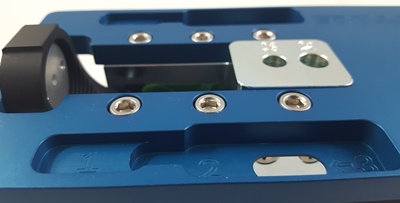
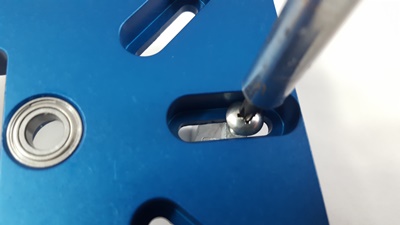
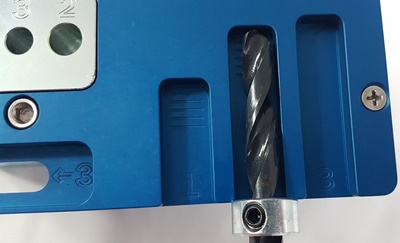
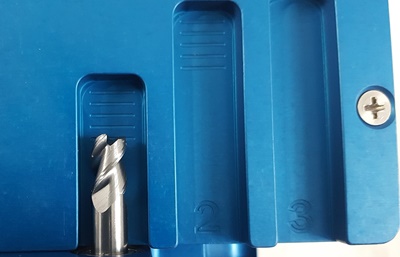
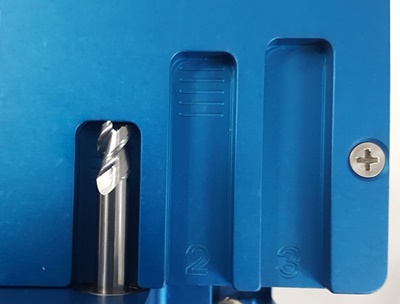
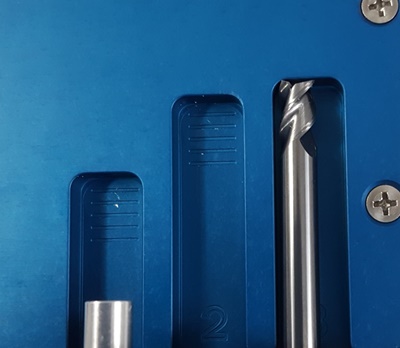
Here are the corresponding cut outs in the top plate of the jig. Note that there are actually three cuts of varying depth milled into the top plate. The length of the pin installed in the router adapter plate determines which part of the jig cut out you are going to be tracing. The most shallow cut out (the largest outer cut out labeled "1") will only be traced when the shortest pin is installed in the router adapter plate. Because the pin is short it can't reach the depth of either sections "2" or 3". The second deepest cut out (the main part of the fire control group pocket labeled "2") will only be traced with the medium length pin. This pin is too long to reach section "1" and too short to reach section "3". The largest length pin will only be tracing the trigger hole in the final milling step and is labeled "3". Again, too long to trace sections "1" or "2".
The 5D Tactical system also eliminates another aspect that many other jig systems use and that's pre-drilling of the fire control group pocket. Whether it's router-based or milling machine based many jig systems have the user remove a lot of the fire control group pocket with a 3/8" drill bit and a series of offset holes. The 5D Tactical jig has the user only drill two holes, one 3/8" hole for starting the end mill in and one 5/16" hole for starting the end mill in for the final machining of the trigger hole. So you will do less pre-drilling with the 5D Tactical system but of course you will then be doing more machining with the end mill. It's also important to note that the larger diameter of the 5D Tactical end mill makes it stiffer and less prone to flex. This should give a better finish to the final machining.
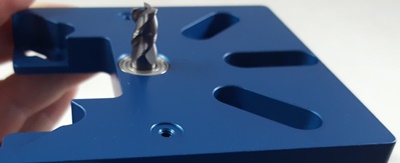
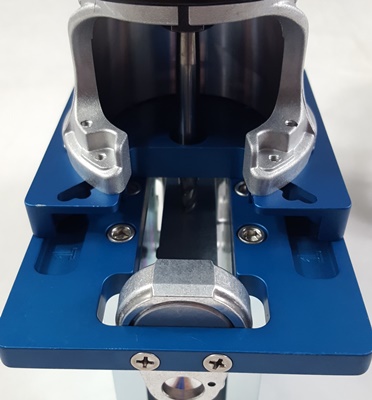
Now let's look at how the jig assembles around a standard mil-spec forged receiver.
Assembling the receiver in the jig:
The user manual for the 5D Tactical jig is very good and I found it easy to follow so I'd recommend you also download it and the router adapter installation instructions for a more complete understanding of the system. 5D Tactical also has some good videos on YouTube showing how to use their jig system and I highly recommend viewing them. Here is the video for the jig assembly:
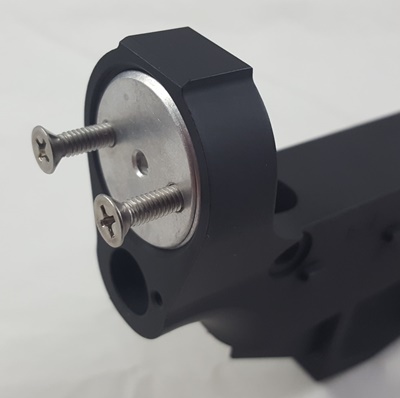
Begin assembly of the jig by installing the "buffer adapter", which is the threaded silver disc, into the back of the lower receiver until it is flush or just below the receiver surface. To make it easier to turn you can thread two of the attachment screws into the adapter. Remove the screws after installation of the adapter.
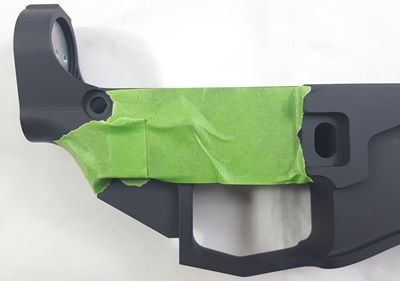
Add some tape to the sides of the lower receiver, especially if you have a pre-finished receiver. This will help keep any stray aluminum pieces from scratching, especially during the drilling of the hammer, trigger and selector holes. Be sure to keep the tape below the top of the receiver and do not cover up the rear takedown pin hole.
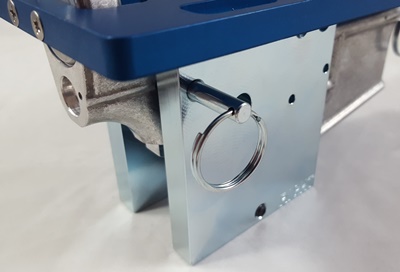
Place the side plates on either side of the receiver with the right side plate, lettering out, on the right side of the receiver (as you would hold the receiver as an assembled firearm). Do the same for the left plate and then insert the longer cotterless hitch pin through both plates and the receiver rear takedown pin hole.
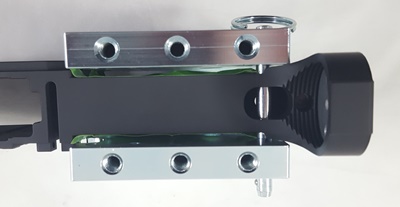
Place the drill guide between the side plates with the "2" facing the front of the jig (though it only fits one way). Align the screw holes in the drill guide with the recessed holes in each side plate and install the four 8/32" screws.

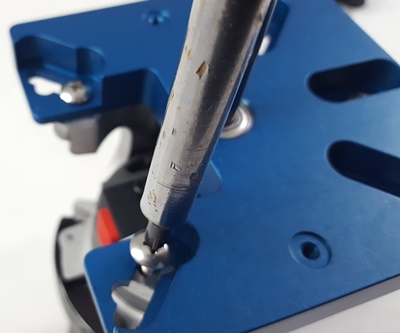
Using a 3/16" Allen (hex) head wrench install the largest 2" screw into the side plates. Install from the left side plate (which is inlet for the screw head) into the right side plate. Stop once the screw is seated so as not to overtighten. This locks the side plates together.
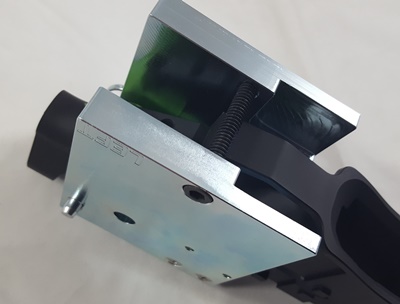
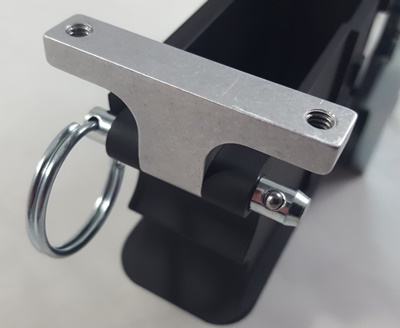
Install the "T" shaped front pivot pin adapter between the front ears of the receiver and lock in place with the shorter cotterless hitch pin.
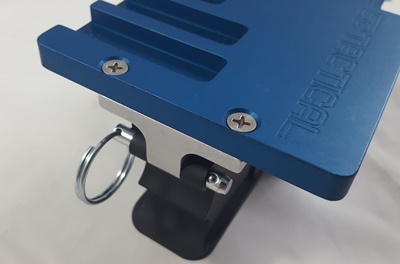
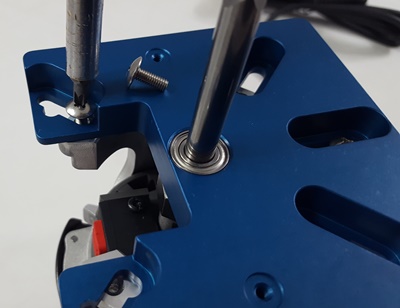
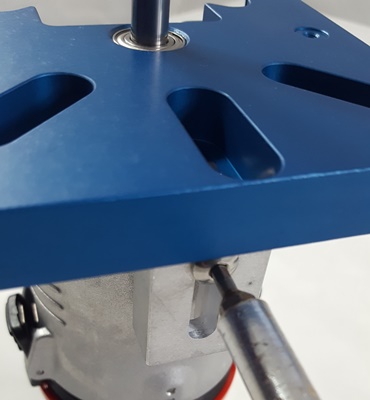
Now place the top plate on the set up so that the rear screw holes align with the buffer adapter, the six largest top holes align with the side plates and the two holes in the top front align with the pivot pin adapter. Loosely thread the two screws into the back of the top plate and into the buffer adapter. This will help keep the jig in alignment for the next steps.
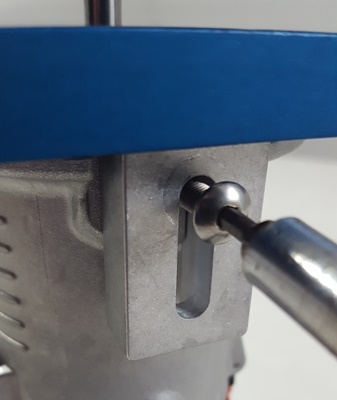
Now insert the two screws in the front of the top plate and into the pivot pin adapter. Alternately tighten each screw until they are both tightened.
Now return to the two screws in the buffer adapter and repeat the process of alternately tightening each of them.
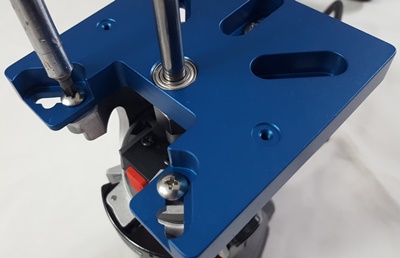
Loosely thread all six of the 3/16" short Allen head screws through the top plate and into the two side plates. Once all are threaded in begin the process of alternately tightening each of them. Check the the drill guide is still aligned correctly in relation to the top plate and hasn't become accidentally skewed up or down on one side.
This completes assembly of the jig to the receiver. Now let's see how the compact router attaches to the 5D Tactical router adapter. The exact method depends on your brand and model of compact router and the manual describes the process for each type. I did not have an adequate compact router so I purchased a brand new Porter Cable PCE-6435 which is the router 5D Tactical gives the highest marks. Also, I like Porter Cable routers. This particular model can generally be had for $120 or less. I purchased the Porter Cable PCE-6435 on Amazon for $99 after a $20 promotional credit. And don't get fooled into buying the PCE-6430 which does not have variable speed.
Assembling the router adapter plate:
First, remove the bottom plate of your router so the adapter plate can be attached to it.
Either adjust the router so the collet is below the plane of the router base or, as I prefer, remove the router base entirely. Then install and tighten the end mill in the router per your router's instructions.

Ensure no part of the tapered section of the end mill is in the collet.
If the method of attachment for your router uses the adapter block loosely install that to the router adapter plate now. The Porter Cable PCE-6435 uses "method 2" which does use this block.
Remove the large rear screw from the router base.

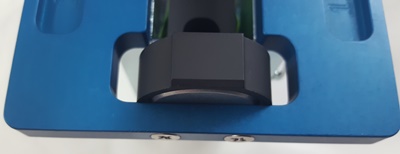
Reinstall the router base and then place the router adapter plate onto the router base. The end mill will pass through the ball bearing in the router adapter so be careful not to damage the flutes during installation.
Align the large opening in the adapter plate away from the power cord and then loosely attach the screws through the adapter plate and into the router base.
If you are using the router adapter block loosely thread the matching Allen head screw through the block and into the router.
Press the block against the router base and tighten the top screw in the adapter plate into the top of the router base.
Now go back and full tighten the Allen head screw in the router block against the router base.
Fully tighten the remaining adapter plate screws to the router base.
This completes the installation of the router adapter plate. However you should make sure that your router base lock collar adequately tightens and locks the router within the base. If it doesn't the router will turn within the base which will cause the end mill to creep down and dramatically increase the depth of your cut. I had this problem the first time I used this jig because it was also the first time I used my new PCE-6435 router. Adjust the lock tension before you start using the router.
Using the 5D Tactical AR-15 router jig
Here is the video 5D Tactical created on milling a lower with their jig system:
NOTE: The 5D Tactical jig instructions say to drill the 3/8" hole and then the 5/16" hole and that is the way I have written it here. When I drill the holes I do the 5/16" hole first. Then I switch to the 3/8" drill bit and drill that hole. This way I do not have to change the bit an extra time when I finally drill the 3/8" selector holes.
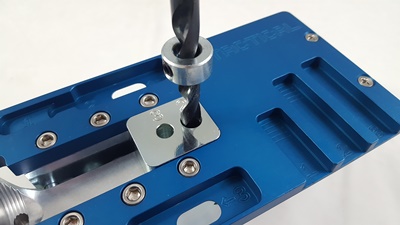
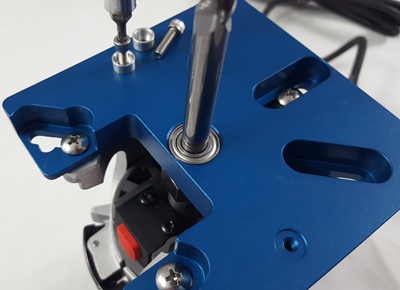
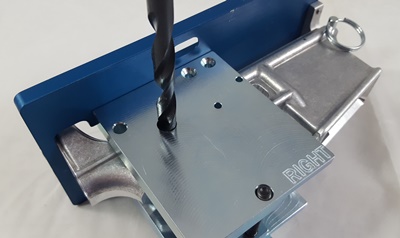
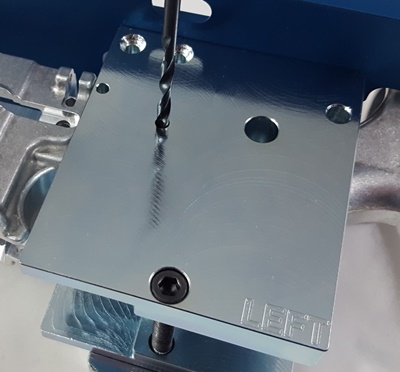
The first step in the machining process, just like every other jig system, is to prepare and drill the non-critical holes. Take the 3/8" drill bit and slip the stop collar on it. Then use drill guide "2" to set the depth of the drill bit. Securely tighten down the lock collar ensuring that the lock screw is fully contacting the outer edge of the bit and not the inner part of the flute. I generally error on the side of too shallow when setting the lock collar rather than risk dimpling the bottom of the fire control group pocket.
Spray WD-40 or other suitable lubricant into hole "2" in the drilling guide. Place the 3/8" drilling bit completely in the guide hole and then begin drilling. If you are using a hand drill make sure, as best you can, that the bit is completely vertical. If using a drill press ensure that the jig is level on the drill press table. Occasionally spray more WD-40 into the hole while drilling and also periodically lift the drill up to help clear any chips. Use caution as the stop collar approaches the top of the drilling guide so you don't press the collar into the guide and cause it to slip or dimple the bottom of the receiver. You only need to get close to touching the collar to the guide without actually doing it.
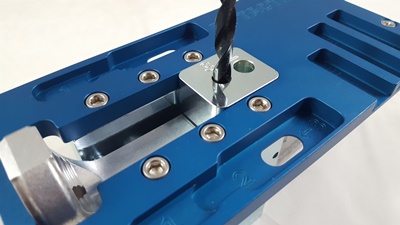
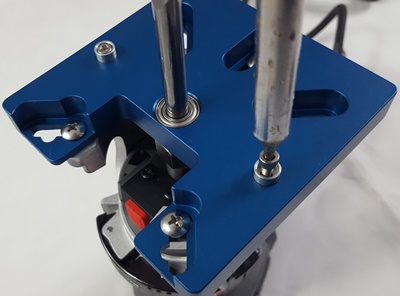
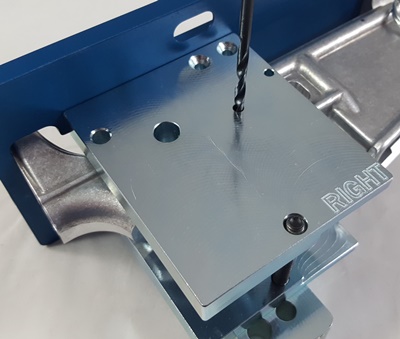
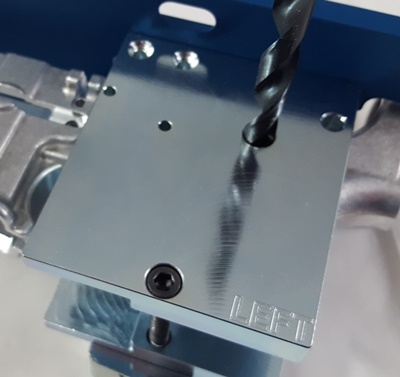
Now switch your drill to the 5/16" bit and place it in hole "3" after spraying the hole with WD-40. Using the same precautions as before drill completely through the lower. As you approach the bottom of the receiver do not press too hard or you will pop through the bottom of the receiver unexpectedly. This could also be an issue if your lower has an integrated trigger guard which could be damaged by the plunging bit.
Now remove the drill guide by first removing the four small screws that attach it to the side plates. Pry the drill guide out of the top plate. A screwdriver inserted into drill guide hole "2" can help pry it upward. You may also benefit from loosening the jaws of the vise if you are using one to hole the jig.
Before beginning the first milling step remove the rear cotterless hitch pin so it and the end mill do not get damaged.
Prepare for the first milling step by installing the shortest pins into the router adapter plate with a 7/64" Allen wrench. Make sure the screws are seating into the open side of the pins and that there is no debris between the pin and screw or pin and adapter plate.
NOTE: As with all router jigs on the market the hash marks are a bit too aggressive in my opinion. I recommend only going a 1/2 hash mark at a time and starting a 1/2 hash below the first hash mark. There is less chance of your end mill biting and jumping with these reduced depth millings. It does add some time but the finished product will be worth it.
Set the depth of the first end mill cut to the first hash mark on guide "1". Make sure the pins do not interfere when setting this depth.
Spray some WD-40 into the drilled 3/8" hole. Orient the jig assembly, or yourself, so the rear of the jig faces you. Place the router with adapter plate on the jig so the end mill goes into the drilled 3/8" hole and the open end of the router adapter plate faces the rear of the jig. The guide pins should naturally fall into plate inside the outer pin guides of the top plate but make sure that is the case before proceeding.
Begin with the router on the lowest speed and then increase the speed as you are ready to begin milling. Move the router slowly and in a clockwise direction as you essentially nibble away at the material. Do not attack the material or push the router hard into it. This can cause the router to jump which can cause damage to the equipment, lower or possibly you. Take your time, especially if you are not an experienced in using a router for milling metal. Occasionally stop the machining to vacuum out some of the metal chips and shavings and re-lubricate the cutting area.
Keep in mind that the most important area is the outer edge as this is the only part that will still be seen once all machining is complete. All of the material in the middle of the fire control group pocket will just be gone. With that in mind I recommend leaving a little bit of material along the edges for last. The less material you have to remove on your final pass the better the finished edge will be. This is true of any jig system and machining process. As you approach the final pass and the edges and corners use a gentle touch when running the pins along the top plate cut outs. Don't force the pins hard against jig or push into the corners. Let the end mill do the work and you just guide the pins along the guide cavities in the top plate.
Once the entire first pass is complete turn off the router and wait for it to completely stop. Vacuum out the chips and re-lubricate the cutting area. Set the depth of the next cut to the second hash mark and repeat the process until you have reached the full depth of depth gauge "1".
Now remove the small pins from the router adapter plate and replace them with the medium length pins.
At your option, re-install the rear takedown cotterless hitch pin. This is not required but I choose to do it.
Set the depth of the end mill to the first hash mark of depth gauge "2".
Insert the end mill into the 3/8" drilled hole and repeat the same steps as you did for the first milling steps. This time the medium pins will follow the "2" guide cavity in the top plate. Continue milling until you have completed the milling to the last hash mark depth.
For the final pass set the end mill depth to the full depth of gauge "2".
Because you have now reached the end of the useful hole created by the 3/8" drill bit you must now start in the narrower, but deeper, 5/16" drilled hole. With the router turned off, place the end mill into the 5/16" hole. Note that the hole matches the end mill size so when you turn on the router it will want to jump a little and will likely contact the sides of the hole. You can minimize this by starting the router on the lowest speed setting (minimizes motor jump) and by keeping a firm grasp on the router as you turn it on.
After turning the router on I recommend doing a little enlarging of the hole at low speed before returning the end mill to the center of the hole and increasing the speed gradually to operating speed.
Now, as before, prepare the router adapter plate with the large pins in order to mill the trigger slot. These large pins will ride in guide cavity "3" of the plate.
Set the depth of the end mill to full depth on gauge "3".
Just like the last step insert the end mill into the drilled 5/16" hole. Grasp the router firmly and start the router at the lowest speed setting. Mill the hole slightly larger, return the end mill to the middle of the hole and then set the router to operating speed to finish milling the trigger slot.
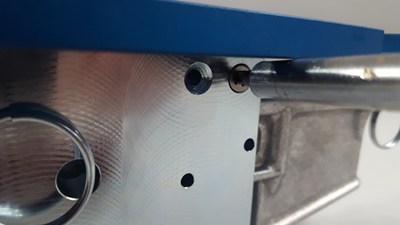
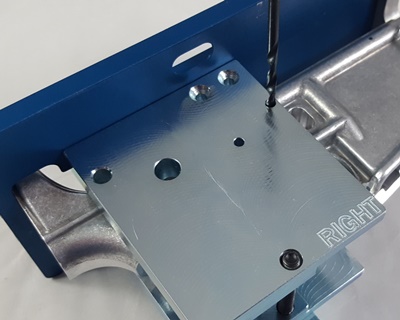
Now we have finished milling the fire control group pocket we can drill the holes for the hammer, trigger and selector. Start by placing the jig in a vise so that one of the side plates is facing up. If you're using a drill press just secure in whatever way is applicable to your press. Start with the 3/8" selector hole and drill all of the way through the first side that is facing up. Use the same precautions to make sure you are drilling perpendicular to the receiver surface. Do not drill all of the way through to the other side of the receiver yet.
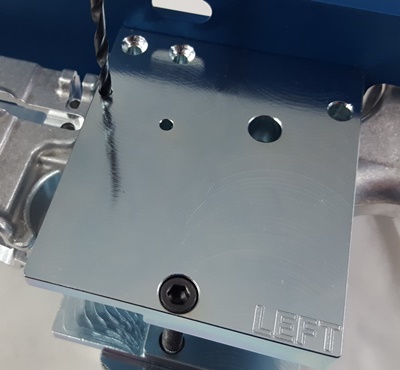
Switch to the 5/32" bit and repeat the process for both the hammer pin and trigger pin holes.
Flip the jig over so the other side plate faces up and repeat the process except now you will start with the 5/32" holes since that is already what is in your drill. The difference is when you drill through the receiver you will continue on through the other side of the receiver (which is already drilled) so ensure the holes line up.
Switch to the 3/8" drill bit and do the same thing for the 3/8" selector hole.
That completes the machining of the receiver. To remove the receiver from the jig you only need to remove three screws and pull one pin. First, remove the large 2" screw holding the side plates together. Then remove the two screws from the buffer adapter and pull the front cotterless hitch pin. Finally remove the buffer adapter from the receiver. The jig can remain in this semi-assembled state until you are ready to machine another lower which saves time on subsequent machining.
Conclusions:
The 5D Tactical jig proved to be a very capable jig with some real advantages. Chief among them is that the end mill is stiffer and it never touches the jig itself. This gives the final machining a smoother finish. It's basically impossible for the user to damage the jig with the end mill or cause the end mill to deflect when tracing the jig templates. Because there are no template inserts to trace it also leaves the milling work space more open and it is easier to see what you are doing and it's easier to vacuum out the cavity between machining passes. There is very little pre-drilling, though there is more milling. There are no templates to switch between, aside from removal of the small drilling guide, and swapping between router adapter plate pins is quick and easy. As far as universality it works with almost all of the lowers I have for testing. I only had problems fitting the Polymer80 WarrHogg AR-308 and the Hybrid-80 (Tennessee Arms made) polymer lowers. The Hybrid-80 almost fit and could be made to fit if you are willing to remove some material from the jig near the "buffer tower".
Another advantage in the system that many users will appreciate is the conversion kit for the AR-10 system. Instead of having to buy an entirely new jig there is a much cheaper conversion kit available. Even if you don't plan to do an AR-10 now there is a good chance you will in the future and this ability is a big plus. And because the conversion kit uses different side plates and top plate you can leave these jigs semi-assembled so there's no major re-build to go between lower types.
Speaking of jig disassembly there is very little to do from the finished machining of one lower to the start of the next lower. One pin, one long screw, two short screws and the threaded adapter removes the finished lower and gets you ready to start the next. This is a real time saver if you are doing multiple lowers in one machining session.
There are some potential disadvantages which some buyers may want to consider. First, you have to use the proprietary end mill for this kit. This is really only a concern if you already have a 1/4" end mill from another jig system and wanted to use it to save money. But if you're starting from scratch in 80% receivers this shouldn't be a concern. Just know that the 5D end mill does not work with the other systems. The end mill itself is about $10 more than the standard off-the-shelf 1/4" end mills but the tool kit 5D sells is only $5 more than tool kits from other jig manufacturers. The other disadvantage I see may come for people who have and planned to use full size routers. That isn't possible with this system so if you only own full size routers you will need to purchase a compact router for this system. On the other hand, new tools to play with! If you don't own a router at all then this isn't a concern since you were going to have to buy a router anyway and a compact router is the most economical option.
As far as cost goes the 5D Tactical jig is right in line with the other router-based jig systems and could be cheaper in some cases. 5D Tactical has added an option to their jig that can lower the cost. That is the option to change the steel side plates to 6061 aluminum sideplates at a savings of $50. On their site that is actually the base configuration so the steel side plates are now considered a $50 option. When the 5D Tactical jig initially came out the jig with steel side plates was $200 which is what I based the cost calculations on. If you go with the aluminum side plates then be sure to subtract $50 from the comparisons. The hybrid (required) end mill is $40 or $50 for the tool kit. Compare this to the 80% Arms Easy Jig which, for a comparable jig with steel insert side plates (still available for $120 (recent price drop) with aluminum side plates), costs $140 (another price drop) or $150 (more steel jig parts) with a $28 end mill or $45 tool kit, or the Modulus Arms heavy duty jig for $200 (steel parts), $30 end mill or a $45 tool kit. So the 5D Tactical system comes in at $250 with the tool kit compared to $245 for the Modulus Arms HD jig or $165-195 for the 80% Arms Easy Jig. Now if you compare the cost of both an AR-15 jig and an AR-10 jig things change. Adding an AR-10 jig to the mix with 80% Arms costs an additional $130 (recent price drop), another $220 with Modulus Arms (HD) and $130 with 5D Tactical. In that scenario both jigs, with tool kits, would cost $380 with 5D Tactical, $335-385 for 80% Arms and $460 for Modulus Arms. UPDATE: 80% Arms has released an Easy Jig Gen 2 which includes provisions to machine both AR-15 and AR-308 pattern lowers in the same jig. The current price is $240 for handheld only routers or $270 with an adapter to use a full-size router. Like the 5D Tactical jig it requires the use of a special 5/16" end mill with a 1/4" shank ($40 or $50 in a tool kit). This would make the Easy Jig Gen 2 the lowest cost jig system for machining both AR-15 and AR-308 lowers.
I will be doing a write up on the AR-10 jig conversion kit and will update this page with links to that when it is available. It's essentially the same as the AR-15 jig but without different plates and specially machined front and rear pins. Look for that soon. I will also have reviews on the 5D Tactical AR-15 and AR-10 custom billet lowers but that won't be until I'm certain I have my new router set up properly. They're very nice lowers and I don't want to machine them until I am familiar with this new router and can be sure it is ready to use.